Tuesday, October 21, 2008

I've Become A Regular Reviewer for TiPb (The iPhone Blog) Forums

Hey guys just to let you know, I have been reviewing apps for the iPhone over at TiPb. Every other day I put out a review about iPhone applications. If there is a review you would like to see for ANY application, post it in the forums (link below), or post a comment to me here.


Introducing: TiPb's iPhone Forum Reviewers! - The iPhone Blog Forums
Rene Ritchie's Avatar
Rene Ritchie Rene Ritchie is offline
Editor, theiphoneblog.com

Join Date: Jan 2007
Location: Canada
Posts: 297
Rene Ritchie is on a distinguished road
Default Introducing: TiPb's iPhone Forum Reviewers!
The Lightning Reviews are dead! Long live the TiPb iPhone Forum Reviews!

Two of our best and most prolific Lightning Reviewers, cjvitek and msbaylor are our first two regular reviewers. They'll be looking at the latest, greatest App Store releases, the classics and old favorites, and some hidden gems.

Have an App you're dying to see reviewed? Drop them a note, and they may just do you a solid! Or just sit back, relax, and watch as they review Apps.
__________________
Rene
http://www.twitter.com/reneritchie

Sunday, September 21, 2008

iPhone App Review: Earthscape

Earthscape is somewhat comparable to Google Earth, but for iPhone.


I originally bought the app for $9.99 and now it's free. My rating will be in regards to it being $9.99

:):):):)
4/5 Stars

GET IT KNOW WHILE IT'S FREE!!!


1. Satellite maps are the only maps, no road labels. There is however city, state and border labels. Also many of the labels have Wiki geotagged articles associated with them (or any wiki article that has a geotag to it)


2. The "locate me" feature is quite nice. You can zoom in to where you are, and then find the wiki articles nearby. Especially if you are in a town/area you wanted to know a little history on, etc. You just click on the wiki label and the wiki page loads within the app.

3. Earthscape added a new feature that allows the user to take a picture and geotag it to your location. You then can view the map with all the photos you have taken, other's have taken, recent photos taken, of the most popular geotagged photos on Flickr.


4. '3D View' When applied it resembles the 3D view in Google Earth. When using one finger to navigate the image, it's like looking around in a bubble, it you use two fingers, you can move you point of view.


Pros:
-Free (for now)
-'Smooth' zooming of maps (instead of going to gray every time you zoom like the built in maps app)
-'3D' view
-intuitive controls (not time consuming to zoom all the way out)
-picture geotagging
-wiki geotagged articles
-rotates in any direction
-Using the EDGE network didn't seem to slow this app down.

Cons:
-no ability to reposition geotagged photos on map (Edge network doesn't always nail my location...)
-Some areas do not have enough imagery when zooming into street level (compared to Google Earth)

[URL="http://www.mscapture.com/f1035324731/"]Photo album located here.[/URL]

Tuesday, August 19, 2008

Setting Up A Forwarding Domain in GoDaddy.com

Login using you customer number and account password (if not already logged in). Login is located on the godaddy.com homepage and is on the right-hand column.

Near the top, in the green bar, all the way to the left reads a button “Domains.”


Move your mouse pointer over the text, a menu will appear and then click on “My Domains”

The next screen shows a list of your domains, in my case I have several, the one I will be using for this example is located at the bottom of the picture below – YourHealthYourWay.net


Click on the domain that you wish to edit.

At the top of the screen is a “forward” button, you will find a box similar to the one below:


Click on the icon labeled “Forward.”

You should see a menu appear similar to the one below:


(click on pictures to enlarge)

You may have to click the check box next to “Enable forwarding” in order to enter the information.
  • 1. Enter the web address that you want the domain to forward to, usually a long and hard to remember web address (reason you are forwarding, right?) In this example I am having it forwarded to my MaxGXL website: http://www.maxgxl.com/######
  • 2. Click on the radio button labeled “301 Moved Permanently” (after a day of setting up the domain, if you still have problems with forwarding the domain, follow the previous steps to get to this point and select “302 Moved Temporarily” instead.)
  • 3. Click on the “Masking” Tab

A similar menu should be seen:


(click on pictures to enlarge)

Check the box next to “Enable Masking.”
  • 1. Enter a “Masked description Meta tag” of what your website offers (this appears in search engines). You want to try to keep this as short as possible. The one I use below is a bit on the long side, so keep it shorter than the example. Since the website I am forwarding to has to do with energy & weight loss, I used:
    • a. MaxGXL provides the proper nutrients needed to promote the body's own ability to manufacture and absorb glutathione. Increasing your glutathione level will naturally increase your energy, detoxify your body and strengthen your immune system.
  • 2. Enter the “Masked Title.” This is the text that will appear at the very top of your browser’s window. In your current window at the very top, you should see “Domain Manager – Domain Details” or something of the like, this is the Browser Title. For my purposes I simply just used: MaxGXL
  • 3. Enter your “Masked keyword Meta tag.” Here you enter keywords, this is used in search engines to find your website. For the example I used:
    • a. maxgxl max gxl vitamin nutrient nutrients body health glutathione weight loss new years resolution energy better detoxify detox loss accelerator
      • i. You may wish to add as many as 15-20 keywords; however, I would not use more than 20 keywords. As you create the keywords make sure they have a space in between each keyword.
  • 4. Click on the “OK” button. You should receive a confirmation similar to the one pictured below:

(click on pictures to enlarge)

You’re all done! It should take a couple of hours before the redirect begins to work, sometimes up to a day, especially if you have just bought your domain, it will take about a day to redirect.
You can now log out or repeat the process for another domain.


See my other domain tutorials:

Coming Soon:

  • Creating an e-mail address that associates with your domain. (exe. YourName@YourDomain.com)
    • E-mail Forwarding or Webmail.
  • Submitting your domain/website to search engines.
  • Fixing the www… problem: (when http://www.YourDomain.com is typed in the address bar, but does not forward to your domain, but http://YourDomain.com , does work).
  • Creating Sub domains. Exe: http://argentina.msbaylor.com , the “argentina” is a sub domain to msbaylor and can be redirected to another web address. Common uses are used for blogs, photos, videos, etc.

Monday, August 18, 2008

Purchasing A Domain From GoDaddy.com


(Click on the images to enlarge them)

You will first need to go to www.godaddy.com and register a domain. To do this, once the site has loaded. At the top it will say, “start a domain search,” (Areas that are circled.) Type in the domain of your choosing:


In the photo below it says that “GETLEAN.COM” is not available. If the domain is not available, then is will say in red “not available” and have an “x” where the checkbox would normally be or will say “backorder now”, just ignore this, it’s not available to you at the moment.


There are checkboxes under the correlating domains that are available, check the checkboxes for the correlating TLDs that you want. The picture below shows circles around the top two TLDs.


Domain Brainstorming Examples:
  • MaxMe
  • MaxMeOut
  • MaxOutYourLife
  • GetLean
  • GetRidOfYourFatAss (don’t use profanity, plus this can insult)
  • NoHealthIsHell (this uses a gray area)
  • Msawyers (or your name or an abbreviation of your name)
  • MattSawyers
  • YourHealthYourWay
etc.

Try to keep your domain simple; you want people to remember the domain, without actually having to look at the card. Here are things you do not want to do….:
  • …Make a play on words
  • …Make the domain long
    • Exe:
      • www.ThisIsAReallyCoolWebsiteThatYouNeedToSee.com
      • www.CheckOutMyWebsiteForStuff.com
      • www.MyVitaminsAreTheBestEver.com
  • …Use profanity
  • …Make the domain convey an irrelevant message for the website’s content.
    • Exe:
      • www.EnergyDrinks.com
        • For a website that sells shoes

Try to get your domain as short as possible and convey the best message.

If you have multiple TLDs to choose from, these are the best in order, if the first one is not available, use the next one below it.

1. .com
2. .net
3. .info (usually used for informational sites)
4. .me
5. .tv
6. .org (use only is you are an organization [usually non-profit])
7. .mobi (used only for mobile websites)
8. .tv

Once you have found a domain that is available, and have selected the correlating checkbox, at the bottom of the page, click the button that says “Proceed to Checkout”


You will be then offered some other offer. In blue text you will see “No, thanks. Proceed to checkout” or something similar. Click this text.


You will then be asked to log in or enter information to create an account.


If you do not have an account with godaddy.com this is where you will create one. After filling out the information, click continue.

I am not sure what will follow after this screen for creating a new account, as I created mine many years ago. But hopefully you will come across the following pages quite soon.
You will have something close to what this page looks like. At the bottom, click the like radio button next to “No thanks. I’m ready to checkout”


And click the button that reads, “continue”


The next page you see will be you shopping cart.
You will see under the product name your domain and then under Quantity, select the number of years you wish (if it’s different than 2). In the example below I am only want 1 year, so I choose 1 year, then click the grey “Update Cart” button.


Your total per domain should be somewhere around $10 (per domain per year).
Also under quantity, there are radio buttons next to “Public” and “Private.” Public means that the information that you will enter on the next page (name & contact info) will be public, meaning basically nearly anyone can see your contact info. I use my P.O.Box at my school for the contact info, as I will not have to worry about junk mail and I use a business contact phone for the number. By selecting “Private” the information will be hidden from the public eye, but it will also set you back an additional $10 per domain/ per year. It’s up to you; you can always add the privacy at a later date if you wish.
You’ll see a box to the right of the “Apply Code” button,

Enter one of the following bolded promo codes, if it applies to you, into the box.

GoDaddy Promo Code:
OYH3 - $3 off/ $6.95 any .COM

Or do a google search for “Godaddy promo codes.”

In the example, I did not use a promo codes, as the promo code does not apply to me. You can only choose one promo code, so find the best one that suites you.


Then click “Apply Code


Your domain(s) should then reflect the promo code.

When you are done changing all the options to your shopping cart, move to Step 2 “Select Your Payment Method”

Select the radio button next to the payment you prefer. In the example I selected Credit Card (1).


Go to Step 3 and click on both of the check boxes (2), then click the “Checkout Now” button (3).

Once the new page loads, you are now going to enter you billing info and your payment info, then click the “Checkout Now” button.


On the next page(s) you should receive a receipt and/or a receipt number and then you will have to enter all the contact info that is associated with your domain that I spoke about before.

**NEXT TUTORIAL: FORWARDING A DOMAIN**

Friday, August 15, 2008

Listen & Record Internet Radio Streams

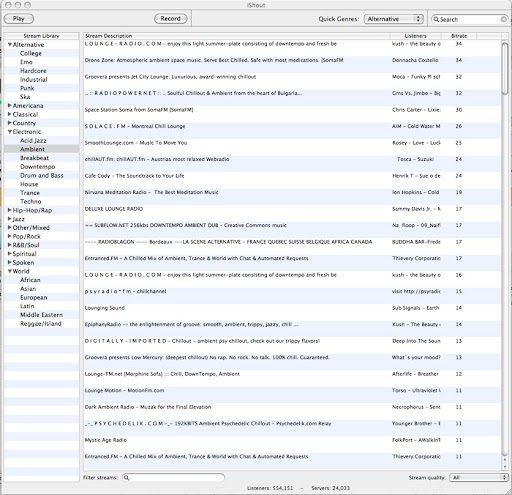
Using iShout, Mac users can click from a large range of channels & genres to choose from (using Shoutcast streams). You also have the ability to search the streams, select whether high, med, or low (or all) quality streams are shown. Very simple interface. Give it a try!

Saturday, March 1, 2008

Feel Like A Pilot Without Needing A Pilot's Licence

A Canadian Inventor took an RC plane and attached a camera where the cockpit would be, but he went further...he took a pair of those AV goggles and attached a gyroscope so that when he moved his head, the camera moved as well. Click the link below to head to the main article & video.

High T3ch » Airplane Toy - Feel like a pilot!

Tuesday, February 26, 2008

Happen to get those dredded Page Cannot Be Found results in Google?

I recently was looking for a Screencast program (free of course) for Mac OS X. A Screencast program allows an user to capture their screen on their computer as a video - in other words - create demos to share. Anyway I did a Google search for "free screencast for mac" search (click on it to view the search). The first result seemed like the perfect result. This website. And I recieved a webpage with this error picture:


So I was quite unhappy that I couldn't see the text I needed. BUT, there is a way you can. By going back to the Google search page, you can click on the link labeled "Cached" underneath the result. This should show you a webpage you originally intended on seeing.

What is happening here is, every so often search engines send out "spiders" to "crawl" across wedpages. So that when you type in your keywords it matches those keywords upto the text that the "spiders crawled" across previously. So basically the cached website is a previous version of the current webpage - it's not up to date, but it's...there.